Your Notes Will Be
Challenged in Court.
Make Sure They Hold Up.
Create digitally signed, timestamped, tamper-proof investigation notes that build an unbreakable chain of custody, from the field to the courtroom.
Free 7-day trial · No credit card required · Cancel anytime
In the Courtroom, Your Notes Are on Trial Too
Investigators spend months building a case, only to have it undermined by documentation that can't prove its own integrity.
Your Timing Gets Questioned
Defense attorneys routinely challenge when notes were actually written. Without cryptographic proof of timing, your testimony faces unnecessary doubt.
Your Documents Can Be Altered
Word documents, spreadsheets, and paper notes offer zero proof they haven't been modified after the fact. Any change goes completely undetected.
Your Evidence Gets Excluded
Without a verifiable chain of custody for your documentation, critical evidence risks being deemed inadmissible, regardless of how accurate it is.
Courts Require Contemporaneous Notes. Can You Prove Yours Are?
In the U.S. legal system, contemporaneous notes (records made at or near the time of an event) carry far greater weight than notes written after the fact. Courts treat them as more reliable because they minimize the risk of faded memory, bias, or reconstruction.
Under the Federal Rules of Evidence, two key provisions govern why this matters for every investigator:
A record may be read into evidence if it was made when the matter was fresh in the witness's memory and accurately reflects their knowledge. The record must have been created at or near the time of the event.
Records of a regularly conducted activity are admissible if made at or near the time by someone with knowledge, kept in the course of regular practice. This standard applies directly to investigative documentation.
Courts in Canada, the United Kingdom, and Australia uphold the same standard. See the full legal framework
The Problem with “I'll Write It Up Later”
Notes written hours or days after an event are routinely challenged by opposing counsel as unreliable. Without proof of when a note was created, defense attorneys argue memory degradation, bias, or fabrication.
Even a Small Edit Can Destroy Your Credibility
If you change even a single word in your notes hours or days later, you need to be able to state exactly what was changed and why. If you can't (and most investigators can't recall minor edits weeks or months later), opposing counsel will argue that if you don't know what changed, something significant may have been altered. The result: your notes are deemed unreliable, and your testimony may be thrown out entirely.
Why You Should Never Use Word or OneNote
for Investigation Notes
They're great productivity tools.
But they were never designed to create court-ready evidence,
and they fail every test that courts demand.
Timestamps Can Be Falsified
Anyone can backdate a document. Neither tool can prove when a note was actually written.
- Word uses the system clock. Change the date on your computer and Word records the false date as real.
- OneNote lets you change any page's creation date. It's a built-in feature, not a hack.
Edits Are Undetectable
Content can be changed after the fact with zero evidence it was ever modified.
- Word's Track Changes is optional, can be toggled off, and permanently deleted with one click.
- OneNote has no change tracking at all. Every edit is silently absorbed. No audit trail exists.
No Cryptographic Proof
Neither tool can prove a document is authentic without an expensive forensic examination.
- No digital signatures. No way to detect tampering.
- Verification requires a forensic examiner at $150-$350/hr (40+ hours).
- That's potentially $10,000+ per document with no guaranteed answer.
The Cross-Examination Trap
What defense attorneys will ask- “Word allows you to edit a document at any time without leaving a trace, doesn't it?”
- “You're aware that Track Changes can be turned off and permanently deleted?”
- “Word relies on the computer's system clock, and that clock can be changed to any date?”
- “So you cannot prove, with any independent evidence, that these notes were written when you claim?”
Any honest answer concedes the notes cannot be independently verified. If the timing can't be proven, they fail the standard for contemporaneous notes, and the legal foundation for admissibility collapses.
Built by an Investigator
Who Understood the Problem
After years in law enforcement, our founder saw the same pattern: dedicated investigators losing credibility over documentation that couldn't prove its own integrity.
Forensic Notes was built to solve this problem permanently.
- Every note receives a SHA-512 digital signature the moment it's created
- Tamper-proof timestamps prove exactly when each entry was made
- Complete audit trails track every access and modification
Everything You Need to Build Airtight Cases
Purpose-built tools that streamline your workflow while ensuring every piece of documentation meets the highest legal standards.
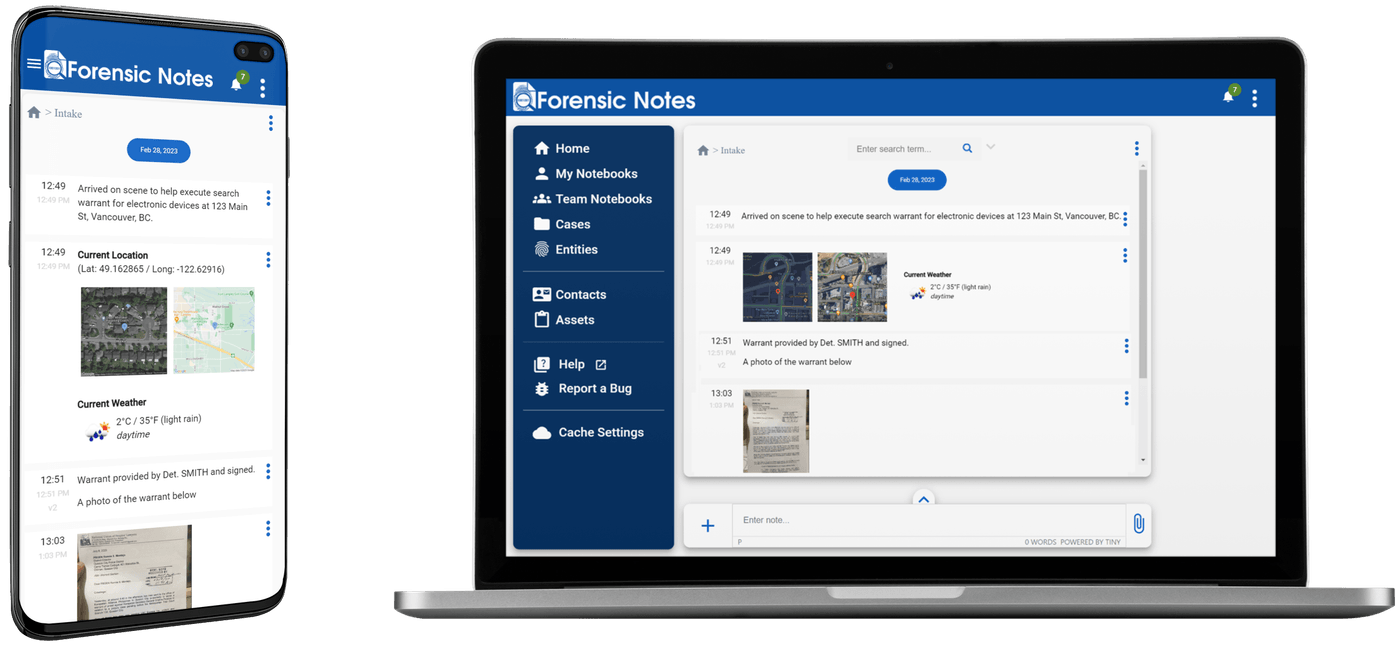
Detailed Professional Notes
Create rich, structured investigation notes with ease. Add text, images, and file attachments, all automatically signed and timestamped the moment they're saved.
Works on Every Device
Progressive Web App technology means Forensic Notes works seamlessly on Windows, Mac, Linux, iOS, and Android. Start notes in the field, finish them at your desk.
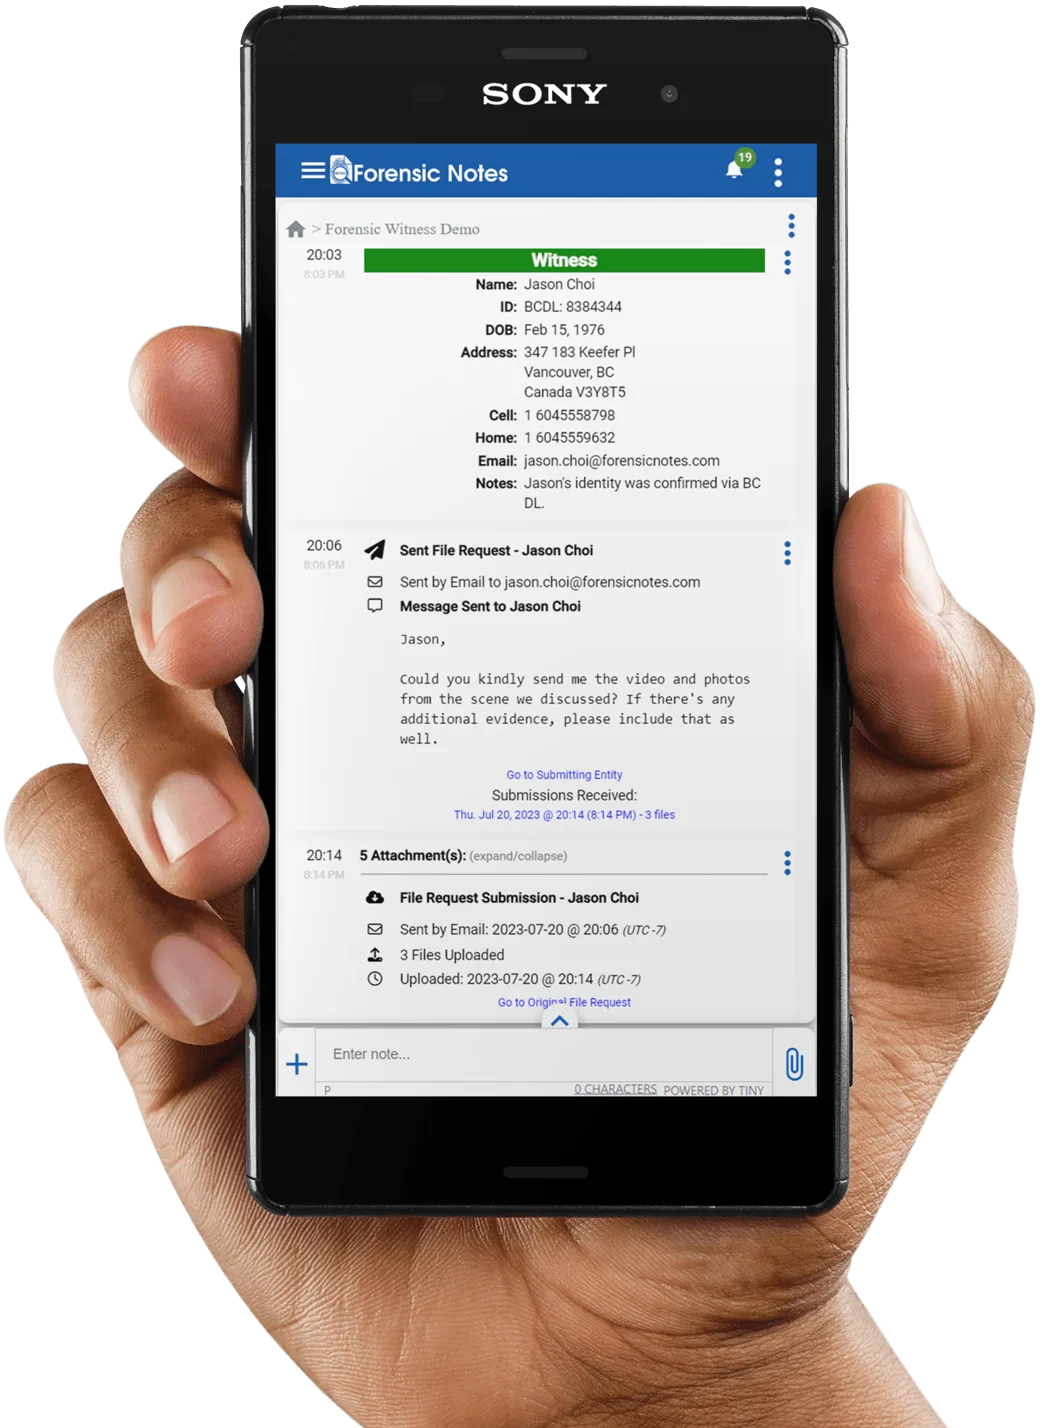
Secure Witness File Requests
Send branded, secure upload links to witnesses and third parties. Files are automatically encrypted, hashed, and linked to your case. No account required for recipients.
Simplicity Meets Powerful Functionality
Ensure Trust with Digitally Signed Notes
Create notes that are digitally signed and timestamped, providing a clear and tamper-proof record for legal confidence.
Access Anytime, Anywhere
Forensic Notes works seamlessly on all devices: desktop, mobile, and tablets. With its Progressive Web App (PWA) design, you can install it on Windows, Linux, Android, or iOS for a native-like experience.

Seamless Voice-to-Text Conversion
Turn speech into accurate text instantly. Voice-to-text eliminates typing barriers, helping investigators capture detailed notes effortlessly, even in high-pressure environments.
No credit card required. Start exploring Forensic Notes today.
Built for Investigators Who Can't Afford to Cut Corners
Private Investigators
Build an unassailable professional reputation. Present clients and attorneys with documentation that proves exactly when you discovered critical evidence.
Digital Forensics Examiners
Maintain rigorous chain of custody documentation. Record your analysis process with the same level of integrity you apply to the evidence itself.
Insurance & Corporate Investigators
Protect your organization from costly litigation. Create documentation that demonstrates thorough, unbiased, and well-timed investigation practices.
Legal Professionals
Support case preparation with timestamped evidence collection. Give attorneys documentation they can confidently present in any proceeding.
Trusted by Investigators and Legal Experts
“Before using Forensic Notes, we were using Microsoft Word which was not designed for forensic investigations. Forensic Notes is the best note-taking tool for digital forensics.”

“The defence does not have to prove anything. All they have to do is raise a reasonable doubt. When that doubt comes from … notes, or lack thereof, then there is effectively no trial … notes alone create the doubt needed to gain an acquittal.”
“Forensic Notes facilitates a seamless transition across devices – from the desk to the cruiser, to the field, and back again.”
Simple, Transparent Pricing
Choose the plan that fits your needs. Every plan includes full access to digital signatures, timestamps, and court-ready reports.
Why Investigators Choose Forensic Notes
See how purpose-built investigation software compares to general-purpose tools.
| Capability | Forensic Notes | Word / Google Docs | Paper Notebooks | OneNote / Evernote |
|---|---|---|---|---|
| Contemporaneous Note Proof | ||||
| SHA-512 Digital Signatures | ||||
| Tamper-Proof Timestamps | ||||
| Court-Ready PDF Reports | ||||
| Chain of Custody Tracking | ||||
| Cross-Device Access | ||||
| Complete Audit Trails |
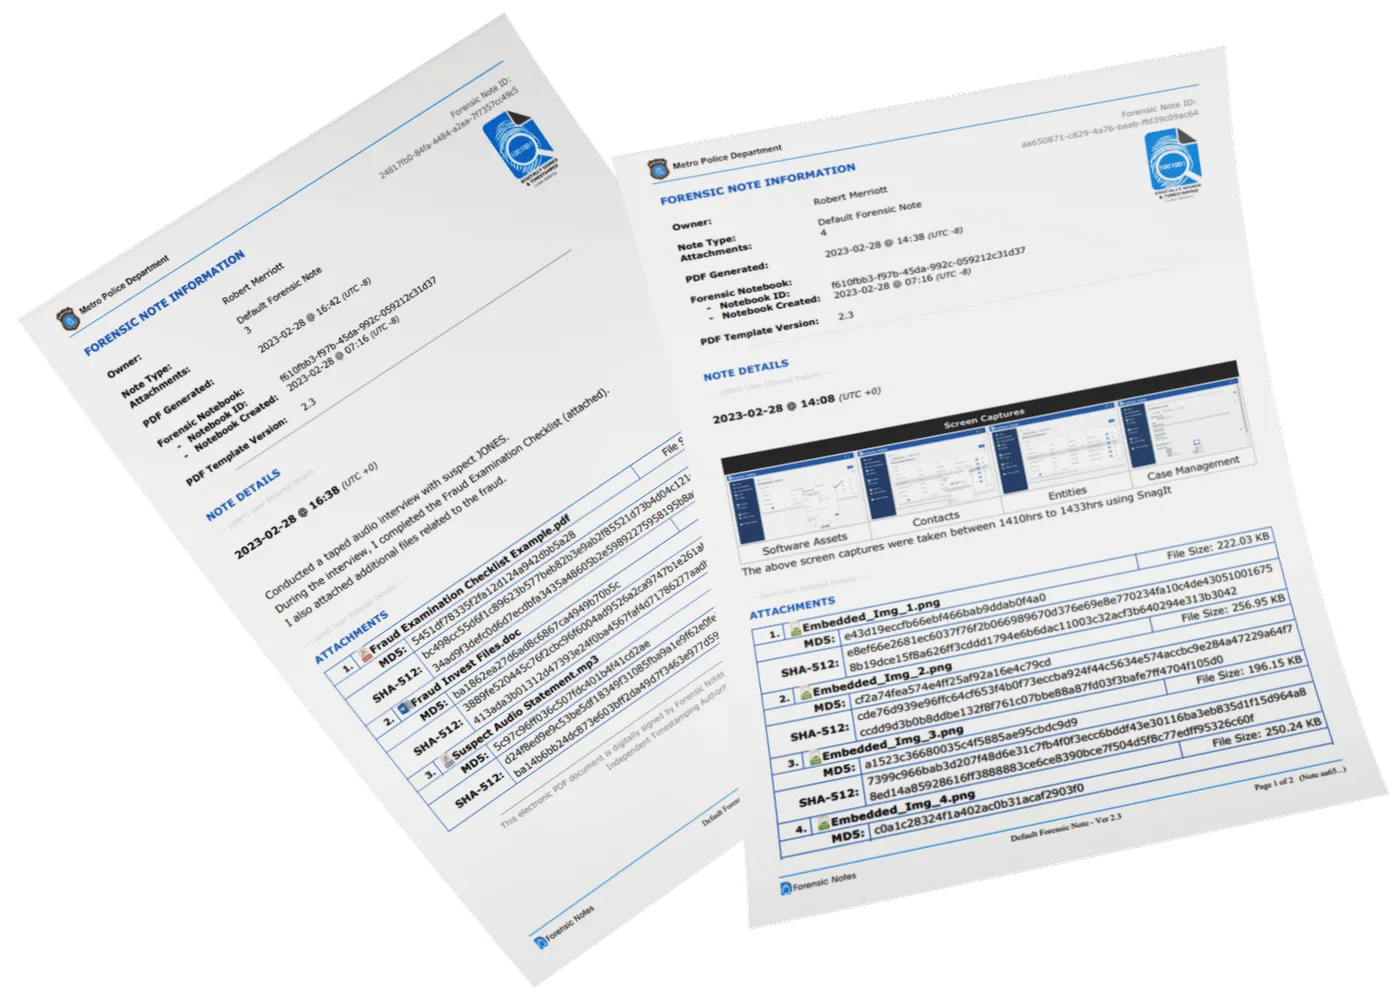
Generate Court-Ready Reports in One Click
Stop spending hours formatting documents for court. Forensic Notes automatically compiles your timestamped notes, digital signatures, attachments, and evidence into professionally formatted PDF reports.
- Every entry includes its original timestamp and digital signature
- Attachments and evidence automatically included
- Full disclosure packages ready for opposing counsel

Common Questions
Your Next Case Deserves Better Documentation
Join the investigators who've eliminated documentation doubt from their practice. Start your free trial and see why Forensic Notes is the standard for court-ready investigation notes.
Free 7-day trial · No credit card required · 57-day money-back guarantee